Creating a Print Monitor
Clicking the Insert button on the Print Monitor screen will allow you to create a new print monitor. A Print Monitor consists of three phases:
Phase 1: Triggering the monitor
A Print Monitor is triggered simply by a flat file (text file) appearing a folder that you specify. An active MMPI Print Monitor constantly watches the folder and if, for example, a separate program on the system creates a flat file within that folder, the Print Monitor will trigger and then move to phase 2. There are different ways to setup the trigger in phase 1 and those are outlined in the Print Monitor Information section below.
Phase 2: Printing using data from the flat file
When a Print Monitor triggers off the creation of a flat file in a watched folder, it will move to phase 2 which is printing. The Print Monitor will run what is called a MarkMagic "Job" or Printer Job. A Printer Job is something that you must create ahead of time before creating the a Print Monitor itself. The Printer Job contains all of the information needed for printing. Information such as the MMPI format design that should be used, the destination printer name, any associated RuleSets, print quantity and speed, etc. Currently, Printer Jobs can only be created using CYBRA's JMagic GUI designer tool. When MMPI runs the Printer Job, it will use the data string that was found in flat file that originally triggered the Print Monitor. The Printer Job name, group and library can be defined in the Print Job Settings section detailed below.
For a brief description on how to create a MMPI Printer Job in JMagic, please see Creating a Printer Job.
Phase 3: What to do with the original flat file
After phase 2 printing, the input flat file that triggered the Print Monitor is technically no longer needed. You have some choices on what to do with the input flat file and they are outlined in the Exit Settings section below.
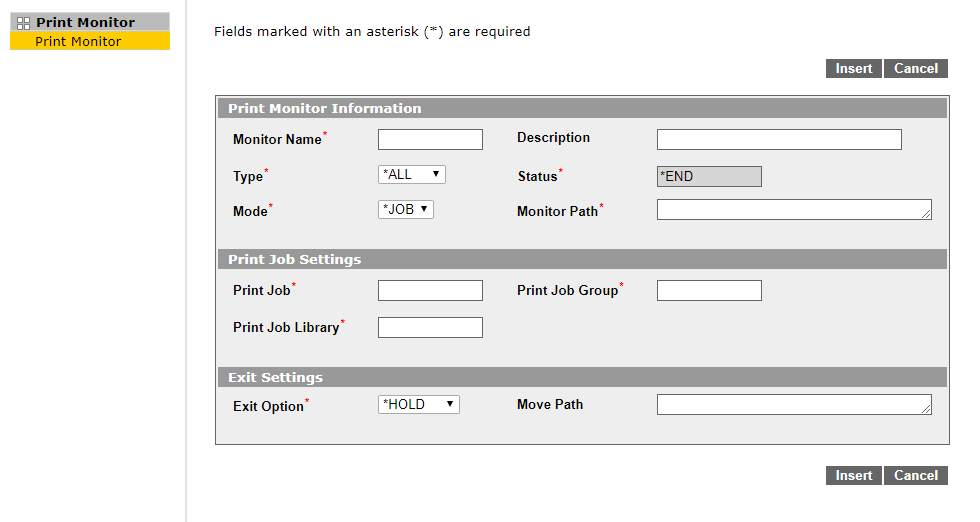
- Monitor Name - Name of the print monitor. Maximum 10 characters.
- Description - Description of the print monitor. Maximum 30 characters. Try to be as descriptive as possible so other users know what this print monitor is for.
- Type - Choose whether or not the print monitor will trigger on any file that shows up in the folder path or trigger only on files with a specific name.
- *ALL - The print monitor will trigger on any file that is created within the Monitor Path folder.
- *NAME - The print monitor will trigger only on files that have a specific name. Please see the setting for Monitor Path below for more information.
- Status - Shows the monitor status. New monitors initially have a status of *END.
- Mode - *JOB is the only option for now. This means the print monitor will run an MMPI Print Job as its execution phase.
- Monitor Path - This is the full path to the folder that the print monitor will be watching. If the Type parameter of this new print monitor is *ALL, then all that is required is a full path simply ending with the monitored folder name. If the Type parameter of this print monitor is *NAME, then the Monitor Path must also include the exact file name and extension at the end. For example:
- If Type = *ALL: C:\Folder\Folder\Folder
- If Type = *NAME: C:\Folder\Folder\Folder\File.txt
For a brief description on how to create a MMPI Printer Job in JMagic, please see Creating a Printer Job.
- Print Job - The name of the Printer Job.
- Print Job Group - The name of the Printer Job group. This group name is simply for organizational purposes. The idea is that you would create similar Printer Jobs all grouped together under the same group name. For example, jobs that are all used for different forms printing could be created under the group name FORMS.
- Print Job Library - The MMPI user library where the Printer Job is created. For more information on MMPI user libraries, please see Manage User Libraries.
- Exit Option - What to do with the original flat file that triggered the Print Monitor.
- *HOLD - Do nothing with the flat file. The flat file will stay in the folder that is being monitored. Flat files will continue to build up in the folder if your Print Monitor is set to *HOLD. This is the default option for this setting.
- *DELETE - Delete the original flat file after the Printer Job is ran. This option helps to keep the monitored folder clean from flat files building up over time. The main drawback here is if you want to manually re-run a Print Monitor process again. The source flat file would be gone and you would have to recreate the file again within your programs.
- *MOVE - Move the original flat file to the specified folder. After MMPI runs the Printer Job, the input flat file will be moved to the directory specified in the 'Move Path' setting. Like the *HOLD value, flat files will continue to build up, but will do so in the folder specified. This is helpful for keeping track of completed Printer Jobs as they will all be in one folder separate from the main monitored folder. If a user wanted to rerun a Print Monitor, all they would need to do is move the flat file from the 'Move Path' folder back into the monitored folder. The Print Monitor would trigger and run the Printer Job again.
- Move Path - used only if *MOVE is selected for the Exit Option. Specify a folder path where flat files will be moved to after the Print Monitor runs the Printer Job.