Create a New Format
The Create a New Format dialog lets you define the main properties of a new MarkMagic format. Values such as format and forms size, rotation, cutter mode, margins, etc. are all defined on this dialog. Note that not all printer drivers in MarkMagic support all of the options listed below. For example, thermal label printers do not support top and side margins. Those parameters will be hidden when editing the properties of formats designed for those printer types.
Note the different tabs available on this dialog window. Be sure to verify all options on all tabs before clicking OK to create your format.
The Create a New Format dialog is essentially the same dialog as the Edit a Format dialog. That dialog is accessed via the Edit menu option while a format is opened in JMagic.

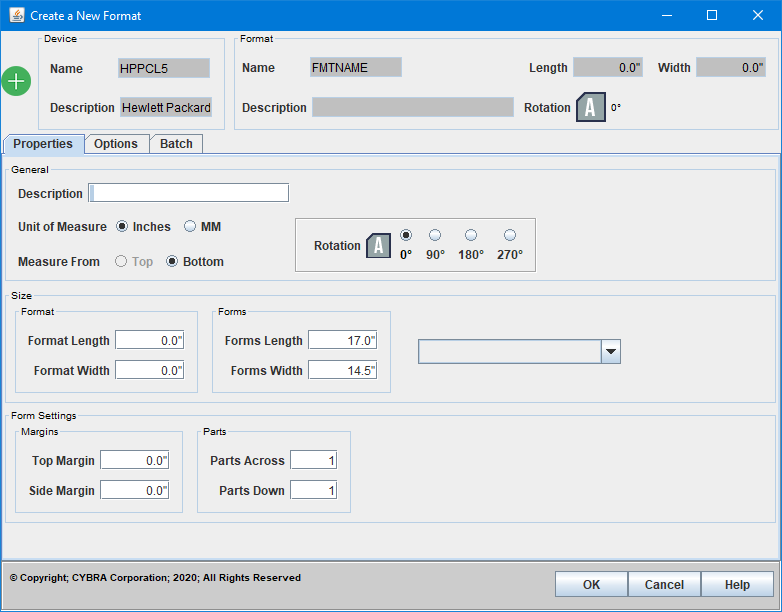
Properties Tab
- Description - A 30 character max description of the MarkMagic format. This is mainly for informational purposes as 10 character format name is sometimes not enough to describe the format.
- Unit of Measure - Based on your preference, format definition and field placement measurements can be either in inches or in millimeters. Specify IN to measure in inches or MM for millimeters. If you choose inches, then all measurement values can contain two decimal positions (hundredths of an inch). Millimeter measurement values can contain one decimal position (tenths of a millimeter).
- Rotation - Key in the amount you wish to rotate the format: 90, 180, 270 degrees, or 0 for no rotation.
- Measure From - Decide if you wish MarkMagic to measure from the bottom or the top of the label. If you select B for Bottom, MarkMagic will measure from the lower left corner. If you select T for Top, MarkMagic will measure from the upper left corner.
- Format Length/Width - Specify the length and width of the label or form. There is also a pull-down menu to the right that allows you to choose from standard document sizes. Width is always measured across the print head of a thermal printer or the exit tray of a laser printer. Based on the unit of measure you selected in the previous field, key in measurements as follows: a length of four inches would be entered as 4, and a length of eight and one-half inches would be entered as 8.5. If your format definition requires that you enter a forms gap (see parameter below), measure the length from the top of one label to the top of the next label. Otherwise, measure from the top of the label or form to the bottom. If the supply is not die cut label stock (it’s a butt cut label, a tag or a ticket), measure from the top of one index mark (either a black mark or an aperture) to the top of the next index mark. Make sure these measurements are exact. If you estimate the size of your label or tag instead of defining exact measurements, your format may not print, you may receive an error message, or your format may print but not appear the way you anticipated. This parameter is typically used to define the design area of the format. If using Parts across/down (see below), it is important to set this value to the size of one individual label to be designed not the size of the full page of labels.
- Forms Length/Width - Type the length and width of the actual supply. Forms width is always measured across the print head of a thermal printer or the exit tray of a laser printer. Type measurements as follows: a forms length of eleven inches would be entered as 11, and a forms width of eight and one-half inches would be entered as 8.5. This parameter is typically used to indicate the full size of the physical paper or label. If using Parts across/down (see below), it is important to set this value to the size of the entire page of labels.
- Top Margin - Applies to laser and forms printers only. Type the amount of the non-printable area at the top of the form in hundredths of an inch, or hundredths of a millimeter.
- Side Margin - Applies to laser and forms printers only. Type the amount of the non-printable area at the side of the form in hundredths of an inch, or hundredths of a millimeter.
- Parts Across - The number of formats across the forms width. When the format is printed it will be replicated across the supply width at print time by the number of parts across specified.
- Parts Down - The number of formats down the forms length. When the format is printed, it will be replicated down the forms length at print time by the number of parts down specified.
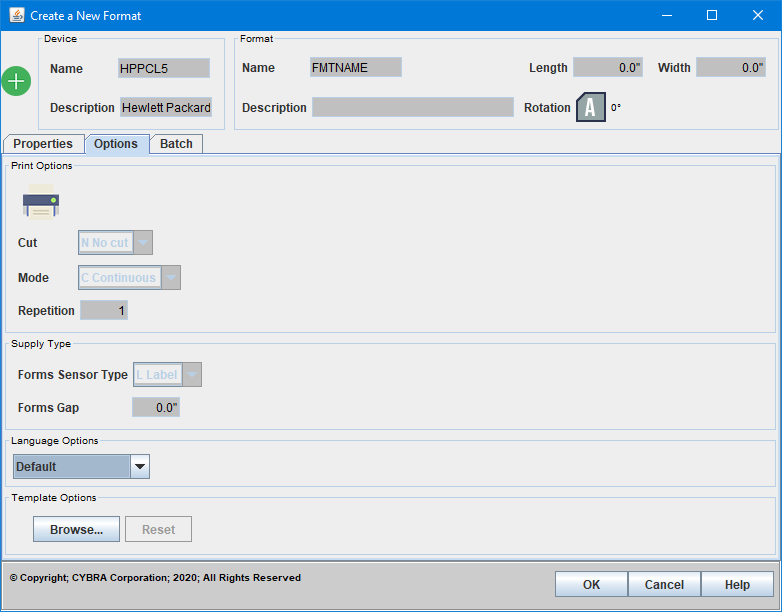

Options Tab
- Cut - The Cut parameter determines how a thermal printer with an optional printer knife cuts supplies during printing. Because the knife edge is not at the same physical location as the print head, the last ticket in a batch will be left in the printer unless instructed to cut. If so instructed, the printer advances a blank ticket to advance the last ticket to the knife edge. Therefore, the values of the cut parameter should be selected based on your expected operating procedure. If you will be running interactive ticketing, and printing one or two tickets in a batch, you will need to cut every ticket including the last ticket. But, if you’re running batch processing, you do not need to cut the last ticket, the printer doesn't have to advance a blank ticket. Subsequent batches will advance the last ticket of the previous batch to the knife edge for cutting. Permitted values for Cut are:
- N - No, if you do not want the knife to cut any tickets.
- Y - Yes, if you want the knife to cut every ticket, but leave the last tag in the printer.
- A - All tickets are to be cut, including last tag in the printer.
- B - If you want the knife only to cut between batches.
- Mode - This parameter controls feeding of supplies and batch separators, and also works in conjunction with the cut parameter. Permitted values for Mode are:
- C (default) - in Continuous mode, all labels in a batch are printed without pause on one strip of supply.
- D - On Demand mode, feeds one label at a time to the operator, and when the label is taken from the printer, the next label is printed and presented. This parameter also controls the rewinding of backing paper if a takeup motor (optional) is installed.
- B - Back feed mode, an alternate “on demand” mode for supplies with a label gap less than the distance between the tear bar and the print head. Use back feed mode when you will be printing on demand, but not peeling and rewinding the backing paper.
- F - Form feed mode, the preferred alternate “on demand” mode for supplies with a label gap less than the distance between the tear bar and the print head. Form feed mode is more efficient than back feed mode on certain printer device types.
- N - Continuous mode, Separator off.
- R - Continuous mode, Separator with black stripe on regular length label or tag.
- S - Continuous mode, 3 mm Separator with black stripe.
- T - Continuous mode, double length Separator.
- Repetition - Used when the format has auto incrementing fields and you wish to print multiple quantities of the same incremented data. For example, an incrementing field on a format with Quantity set to 10 and Repetition set to 2 would result in 1,1,2,2,3,3,4,4,5,5 printed on the labels.
- Forms Sensor Type - You need to specify sensor type in the format definition when your selected printer type does not have an offline printer configuration option for supply type. This value instructs the printer (usually a thermal printer) which supply sensor to enable. There are two basic types of sensors reflective and transmissive, note that a printer can have multiple sensors of each type installed. Reflective mechanisms sense either the presence of a black mark on the back (non-printing side) of the supply, or sense the presence or absence of the actual supply itself (used most often with a notched tag or stock that has center apertures “holes” punched between tickets). Transmissive mechanisms sense the gap between adjacent die cut labels. Alternately, it may be possible to disable supply sensing. Some printers permit the use of non-indexed supplies, for example forms which have no black mark, label gap, or aperture and rely solely on the format measurement instructions sent by MarkMagic. These supplies permit the mixing of variable length formats in a single stream. Sensor Types include:
- B - if your supply is indexed with a black mark at the center.
- E - if your supply is indexed with a black mark on the edge.
- L - if your supply is a one-up die cut label. (This is the default.)
- M - if your supply is a die cut label stock with more than one label across the width.
- T - if your supply is a tag indexed with a center aperture.
- P - if your supply is a label and will be used in a “peel off,” on demand mode (see Mode below).
- O - if your supply is non-indexed and you wish to disable all supply sensors.
- Forms Gap - When you measure the length of a format from the top of one label to the top of the next label, you should measure and key in the exact space between the adjacent labels. A typical industry standard gap is .12" (an eighth of an inch). Measure your supply precisely to be sure.
- Language Options - Various options for setting Chinese, Japanese and Korean language settings.
- Template Options - Browse to select a template to assign to the format. Please see Import Templates for more information.
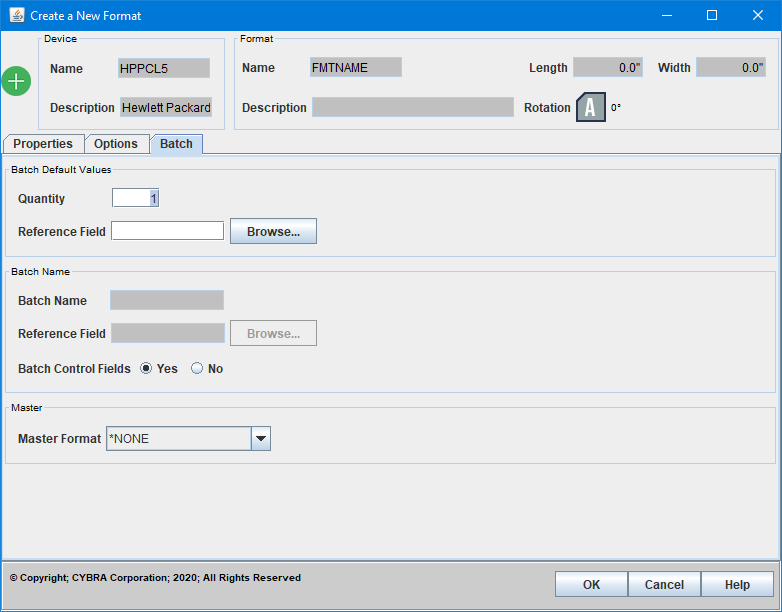

Batch Tab
- Quantity - The default number of labels you want to print any time this specific format is printed. If you wish to use MarkMagic’s 'Auto quantity' feature to automatically print a quantity of labels or forms based on a value from the database, please see Reference Field.
- Reference Field - This field is optional. You may specify a variable field from your format that will contain the quantity value for each record that MarkMagic will refer to at print time. If accessing this tab on an already created format with variable fields, you may click the Browse button to choose from a list of variable fields.
- Batch Name - This field is optional. You may use it to assign a name to this particular batch. This name can be up to eight characters long. Depending upon your printer type, this optional naming convention can display the name of the current batch that is being printed on the printer’s display panel. You can key in a specific name for the batch or use the special values *SEQ or *REF:
- *SEQ - Displays the current record number being received from the System i.
- *REF - Displays the value of a selected Reference Field in the current batch record being received from the System i.
- Reference Field - This field is only used when Batch name field is *REF (Reference). Choose the database field that will contain the batch name value for each record that MarkMagic will refer to at label printing time. The Reference Field must be a data, bar code, or text field defined in the label file.
- Batch Control Fields - Specify if you wish the Batch Control Fields to be included when the Label file for this format is generated. The default is Y.
- Master Format - Use the pull down menu to choose a *MASTER format that this format will be dependent on. The list is made up of *MASTER formats from the current user library.