Master *MASTER and simplify your MarkMagic integration

Do you need to maintain sets of similar labels or forms? If you answered yes, your job just got easier! The MarkMagic *MASTER feature was designed specifically with your needs in mind.
Master Formats allow customers to maintain one label format, one label file, and one label DDS, and have any number of formats dependent on each Master Format. The dependent formats inherit the fields of the Master Format, reducing considerably the time needed to maintain a label format library. If, for example, a new field needs to be added to a data base, only the Master Format needs to be modified and all dependent formats can instantly use the new field.
When To Use *MASTER and Dependent Formats
Master formats contain Data fields only. Other “Dependent” formats refer to Master formats, linking to the Data fields as needed. Dependent format variable Text, Bar Code, and variable Graphic fields are linked to their associated Master fields. This makes it easy to maintain many formats, especially across different device types, without having to deal with Data field changes and resulting label file impact to each individual format.
Master Formats are ideal for customers and software developers who need to maintain many different formats for different printer types. For example, if you need to add a new field, you only need to add the field in the Master Format and the new field is available in all dependent formats. In addition, you only need to program for one interface no matter how many printer types and different formats are needed by your application. Using this feature, similar formats can be grouped together and represented by a single “master” format. An addition to the master is automatically reflected in all dependent formats.
Dependent formats “inherit” variable fields from a Master format. Other format attributes such as printer type specific information and other field types, such as character constant bar code and text fields, line, box, and constant graphic fields are defined in Dependent formats.
For the purpose of this example let's say you need to create 10 different shipping labels for your retailers. Although these 10 formats look different, they use similar variable information. The ability to group all the possible variable fields required for these 10 formats into one “super set” of fields is really the only determining factor when contemplating the use of a Master format. Let's go with the assumption that your 10 different shipping labels use a total of 30 different variable fields. Some fields may be used in each format and others may only be used in one format. This is a perfect scenario for using Master and Dependent formats to streamline your integration and maintenance efforts. Master formats can also be used in conjunction with our PrintTransformer add-on option to switch MarkMagic Formats using spool file data page by page with zero program integration effort.
Here's how to create a *MASTER format in MarkMagic
Create a Master format with all the possible variable fields. All Master format fields are defined as Data fields. “Printing fields” (text, line, box, bar code, graphic, and RFID) are defined on the Dependent format. Note: Dependent and *MASTER formats must be defined in the same MarkMagic user library
- Start MarkMagic (STRMRKMAG) and choose Format/New from the dropdown menu. The Create a format window will appear
- Choose Device Name *MASTER and enter Format Name MASTSHIP (press enter)
- Type a format description example “Master Shipping Format” (press enter and confirm)
- From the Design a Format canvas, press F6 to add a new field. You will be taken directly to the Work with Data Field screen (remember Master formats only allow Data field types)
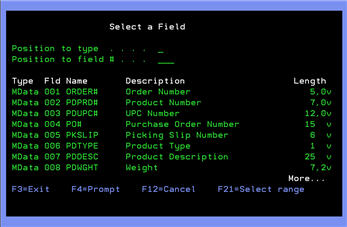
- Begin adding your variable fields by pressing F4 for the field name, browsing your database and selecting the field you need. Note: Once the Select a Database Field window is open, a quick way to add all the fields in your file as Data fields is to use the F21 “Select All” feature. Confirm the first field selection and MarkMagic will automatically create data fields for all the fields in your file.
- Next, add any constant “*HEADING” data fields you may want to use to help combine your Dependent format fields. Example: a data field with a blank space and/or special characters (see example below) NOTE: It is ok if you forget to add a field to your Master format, the power of this approach is the ability to go back into the Master format and add new fields at any time which will immediately be available to the dependent formats.
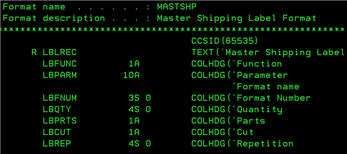
- Create a label file against your Master format. This is the only file you'll need to populate at print time. Record by record the LBPARM field (format name) can be changed to print a different dependent format. Note: If you weren't using the Master format approach a new label file would be required for each format.
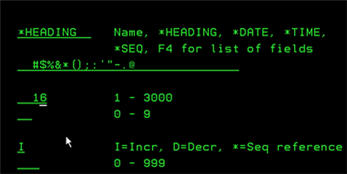
Add a *HEADING Data Field to your master format for editing ease. Spaces and special characters will be available for linking when you define your Dependent formats.
Here's how to create Dependent formats in MarkMagic
Dependent formats are exactly the same as your normal printed format with the exception of their data source. Dependent formats can only use variable data from their assigned Master format.
- Choose Format/New from the MarkMagic main menu and choose your desired target print device name. Name your format and press enter. The Work with Format Definition screen is where the Master format is assigned. Supply your usual format information (description, length, width, mode…) and then press F4 on the Master Format Name field. A list of Master formats in your current user library will be displayed, select the one you want to use (MASTSHIP). Press enter to confirm.
- Once on the design canvas, new fields can be added just like an other format. Press F6 to create your line, box, graphic and static text and bar code fields.
- Add a variable field by typing *LINK for the field name and press enter once (this will automatically page down 3 times) to the Work with *LINK Source Fields. Press F6 to add a new source field and pay close attention to the fields listed in the Select a Field Window. All the Master formats data fields are displayed as MData field types (the “M” is added to the beginning to denote a field coming from a Master format). See screen shots below. Select the field(s) desired to populate this *LINK field (press enter to confirm their addition) and then page up to the top of you *LINK field and then press enter and enter again to confirm your *LINK field creation.
- Complete your format creation. To complete your other nine shipping labels, most of the time it is faster to copy a completed dependent format and then make the modifications for each retailer. You can also create the format from scratch, just be sure to assign the same *MASTER format for your set of dependent formats.
When you press F6 to add a new source field to your *LINK dependent text or bar code field, all the Master format's data fields are displayed as MData field types (the “M” is added to the beginning to denote a field coming from a Master format).
When you press F6 to add a new source field to your *LINK dependent text or bar code field, all the Master format's data fields are displayed as MData field types (the “M” is added to the beginning to denote a field coming from a Master format).
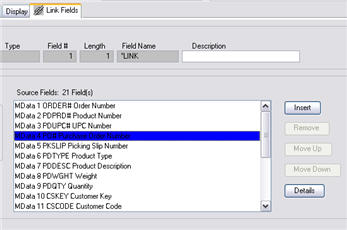
In JMagic, when you select the Link Fields tab to add a new source field to your *LINK dependent text or bar code field, all the Master format's data fields are displayed as MData field types (the “M” is added to the beginning to denote a field coming from a Master format).
Here's how to print Dependent and Master formats in MarkMagic
At print time, there are two methods to direct MarkMagic to print Dependent formats, both of which simplify programming requirements as the application program or programs only have to deal with one physical file, regardless of the number of different formats used.
With either technique, the label file you specify in the PRTLBLF (Print a Label File) CL command is the label file you created for the Master Format.
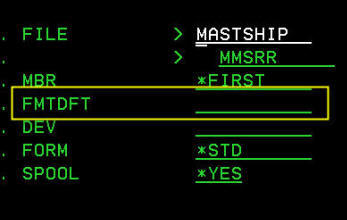
Method #1 is to specify the Dependent format the FMTDFT (Default Format) parameter in the PRTLBLF (Print a Label File) CL command.
In fact you may want to create MarkMagic Jobs for each Dependent format and then run the Job to print that retailer's labels.
Method # 2 is to print Dependent formats under program control. When the application program writes label records to the Master label file, it must set the LBPARM field to the name of the Dependent format on a record by record basis. Alternatively, use the PrintManager add-on option to set the LBPARM value based on data in the label file.